Configuring Altair Client
This article describes how to configure Altair for multiple environments, and how to run a pre-execution script to authenticate against VMware Tanzu’s GraphQL API if required. Altair can be downloaded as a desktop application, or installed as a browser plugin - these steps work for all versions.
Create an Environment
Altair uses Environments to store global variables that can be accessed using the {{variable-name}} syntax. We will use an Environment to store configuration (the Tanzu User Token and FQDN) as well as programatically storing variables (the authentication header and expiry date). This allows you to write queries that can be re-used in different environments by incorporating the variables.
Create an Environment for each Tanzu Organization you wish to access:
- Click on the Environment select drop down (top right)
- Click “Environments”, then “Add Environment”
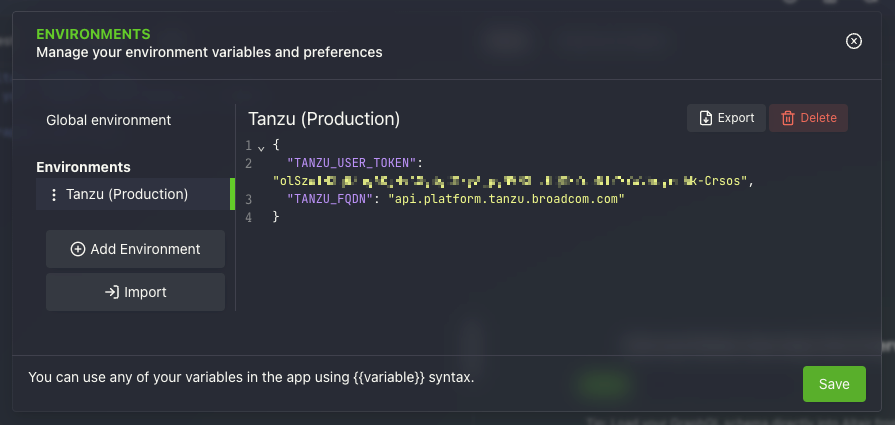
- Add JSON to create the
TANZU_USER_TOKENvariable, with your CSP User Token scoped to Tanzu Hub - Add JSON to create the
TANZU_FQDNvariable (e.g.api.platform.tanzu.broadcom.com) - Name and save the environment
Create a Collection
A collection is a grouping of saved queries that can inherit some of the same settings. For example, we will create a “pre-execution” script to authenticate against the GraphQL API - this will run before the execution of any GraphQL query in the Collection and ensure the API token is generated. Create a collection to hold all the Tanzu Hub requests and to provide a pre-request script to authenticate all calls.
Create a new request that will call the Authentication mutation and generate an access token. You can use this query to manually generate the Bearer token that is needed for the authorization header in each query.
- Create a new query
- Add the URL with the
TANZU_FQDNvariablehttps://{{TANZU_FQDN}}/hub/graphql - Add the authentication mutation to the query window
mutation($TANZU_USER_TOKEN: String!) { authMutation { generateAccessToken(userToken: $TANZU_USER_TOKEN) { authorization } } } - Add a variable in the Variables pane (you might need to expand this pane). The variable’s value maps to the
TANZU_USER_TOKENenvironment variable:{ "TANZU_USER_TOKEN": "{{TANZU_USER_TOKEN}}" } - Click the save icon, and select “Add to Collection” from the drop down menu

Adding a query to a collection - Name the request, and select “create an new collection”. Enter a name for the new collection

Creating a new collection
Once the Request is saved you can click “Send Request” to ensure the TANZU_FQDN and TANZU_USER_TOKEN variables are set correctly. The result should show 200 OK and the authorization Bearer token:

Create a Pre-request authentication script on the Collection
Altair allows you to execute a pre-request script on both a collection and a request itself - the collection one will execute first, followed by the request one. The Collection pre-request will apply to every Request in the Collection (if you tick the Enable pre-request script on the query).
- Click the three dots on the Collection and open the Edit menu

Edit the collection - Add the pre-request script (see below for code) to the Pre-request window and tick “Enable pre-request script”

Enable a pre-request script - Save the collection
The code block below has been commented to explain what it’s doing. The script will check for an existing authorization header and an expiry date/time for the existing header. It then compares the current date/time with the expiry to check if it’s already expired or still valid. If it’s valid, the script will return and the existing token will be used. If it’s expired, or if there is no value set (i.e. one does not exist) then the script will execute the authMutation to generate a new authorization header. Finally, the newly generated header will be saved to the current Environment along with the expiry date/time.
| |
Create new requests
With the Collection and pre-request script configured we can create a new request without having to authenticate each time.
- Click “Add new” to create a new request and add the request URL if it’s not already populated
https://{{TANZU_FQDN}}/hub/graphql - Create your query and any variables required
- Click the “Set headers” icon (top left)
- Add an Authorization header using the
TANZU_AUTHORIZATIONvariable (this is created by the pre-request script and holds the Bearer token) and save. The variable may display as an error until the pre-request script is executed for the first time - this is expected.
- Select the “Pre-request” tab and tick the “Enable pre-request script” - if you don’t enable it here, the Collection’s pre-request script will not execute! You do not need to add any script in the box (but you can, if desired, add scripts to execute after the Collection’s pre-request script)

- Click on the save icon and “Add to Collection” (you must add to the Collection to inherit the pre-request script from the Collection)
- Add to your Tanzu Hub collection and save
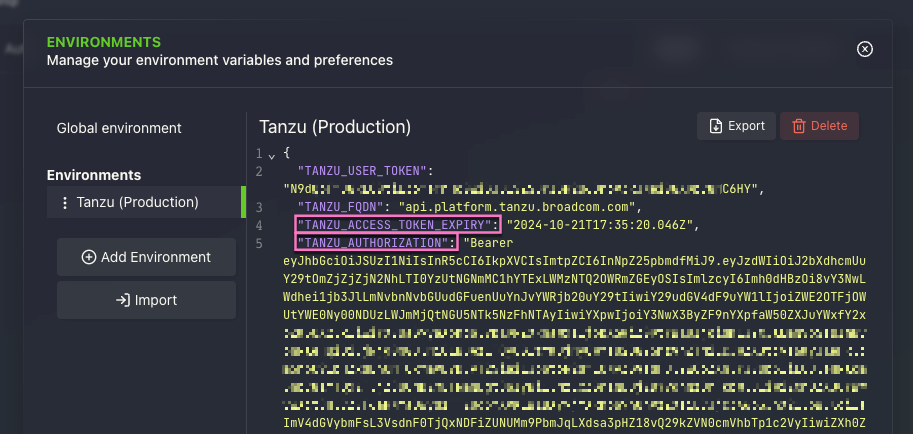
Now when you execute the query using the SEND REQUEST button, the pre-request script will execute the authorization mutation and create an environment variable for the bearer token and the timestamp for it’s expiry. That token will be re-used until it expires, when the authorization mutation will be used again. If you look at your environment variables again, you should now see the two additional variables, TANZU_ACCESS_TOKEN_EXPIRY and TANZU_AUTHORIZATION